
You want to start replacing light switch without any worries. A safety imperative comes first. Always turn off the power before you touch a light switch. Grab a voltage tester to check for no power. If you use the right tools, you can replace light switch confidently. This step-by-step guide makes changing a light switch easy.
Tip: Never skip checking your light switch with a tester!
Key Takeaways
Always turn off the power at the breaker before starting any work on a light switch. This step prevents electric shock.
Use a voltage tester to confirm that there is no power before touching any wires. This simple tool can save you from accidents.
Label all wires before disconnecting them. This helps you remember where each wire goes when installing the new switch.
Light Switch Safety Steps
Turn Off Power at Breaker
You want to start with the most important step—turning off the power. Go to your breaker box and flip the switch that controls the light switch you plan to replace. This step keeps you safe and prevents any chance of shock. Never trust that a light switch is off just because the light does not work. Always cut the power at the breaker before you touch any wires.
Tip: Label the breaker you turn off. This helps you remember which one controls the light switch.
Test for No Power with Voltage Tester
After turning off the power, you need to test for power. Grab a voltage tester and check the wires at the light switch. This tool tells you if any electricity remains. The rule is simple: test before you touch. A voltage tester can prevent accidents and protect you and your home. You should always follow this safe method when changing a light switch.
Always verify the absence of live voltage before starting work.
The principle of 'Test Before You Touch' is crucial to prevent accidents.
Safety procedures protect lives and equipment.
Use Proper Safety Gear
You should wear non-conductive gloves and safety goggles before you start changing a light switch. These items protect your hands and eyes from sparks or debris. Good safety gear is a big part of electrical safety. Make sure your new light switch matches the amperage and wiring in your home.
Here are some common mistakes people make when replacing a light switch:
Common Mistake |
Description |
|---|---|
Skipping the voltage test |
Always test for power to ensure the power is off, not just assume. |
Misidentifying wires |
Label wires when disconnecting to avoid improper connections. |
Wrapping wires counterclockwise |
Always wrap wires clockwise for a secure connection. |
Not checking the amperage rating |
Make sure the switch matches the circuit's amperage rating. |
Leaving old backstab connections |
Use terminal screws instead of backstab connectors for reliability. |
If you follow these steps, you will make changing a light switch safe and easy.
Tools and Materials for Light Switch Replacement
Tools Checklist
You want to gather all your tools before you start. Here’s a simple list to help you get ready:
Flathead screwdriver
Phillips screwdriver
Non-contact voltage tester
Needle-nose pliers
Electrical tape
These tools make the job easier and safer. You can find most of them in a basic toolbox.
Materials Checklist
You also need a few materials for a smooth light switch replacement:
Replacement light switch (make sure it matches the old switch’s amperage and voltage)
Replacement cover plate (optional, but it gives a fresh look)
You can pick up these materials at any hardware store. Always check the label on your new light switch to match your home’s wiring.
Why Each Item Matters
Each tool and material has a special job. The flathead and Phillips screwdrivers help you remove and attach screws on the light switch and cover plate. The non-contact voltage tester keeps you safe by checking for live wires. Needle-nose pliers let you bend and shape wires for a tight fit. Electrical tape covers any exposed wire ends and adds extra safety.
The replacement light switch is the star of the project. You need one that matches your old switch to avoid problems. A new cover plate makes everything look neat when you finish.
Tip: Lay out all your necessary tools and materials before you start. This keeps your project stress-free and helps you focus on each step.
Step-by-Step Guide to Replacing Light Switch
Ready to get started? This step-by-step guide will walk you through replacing light switch safely and easily. You will find each step simple to follow, even if you have never tried changing a light switch before.
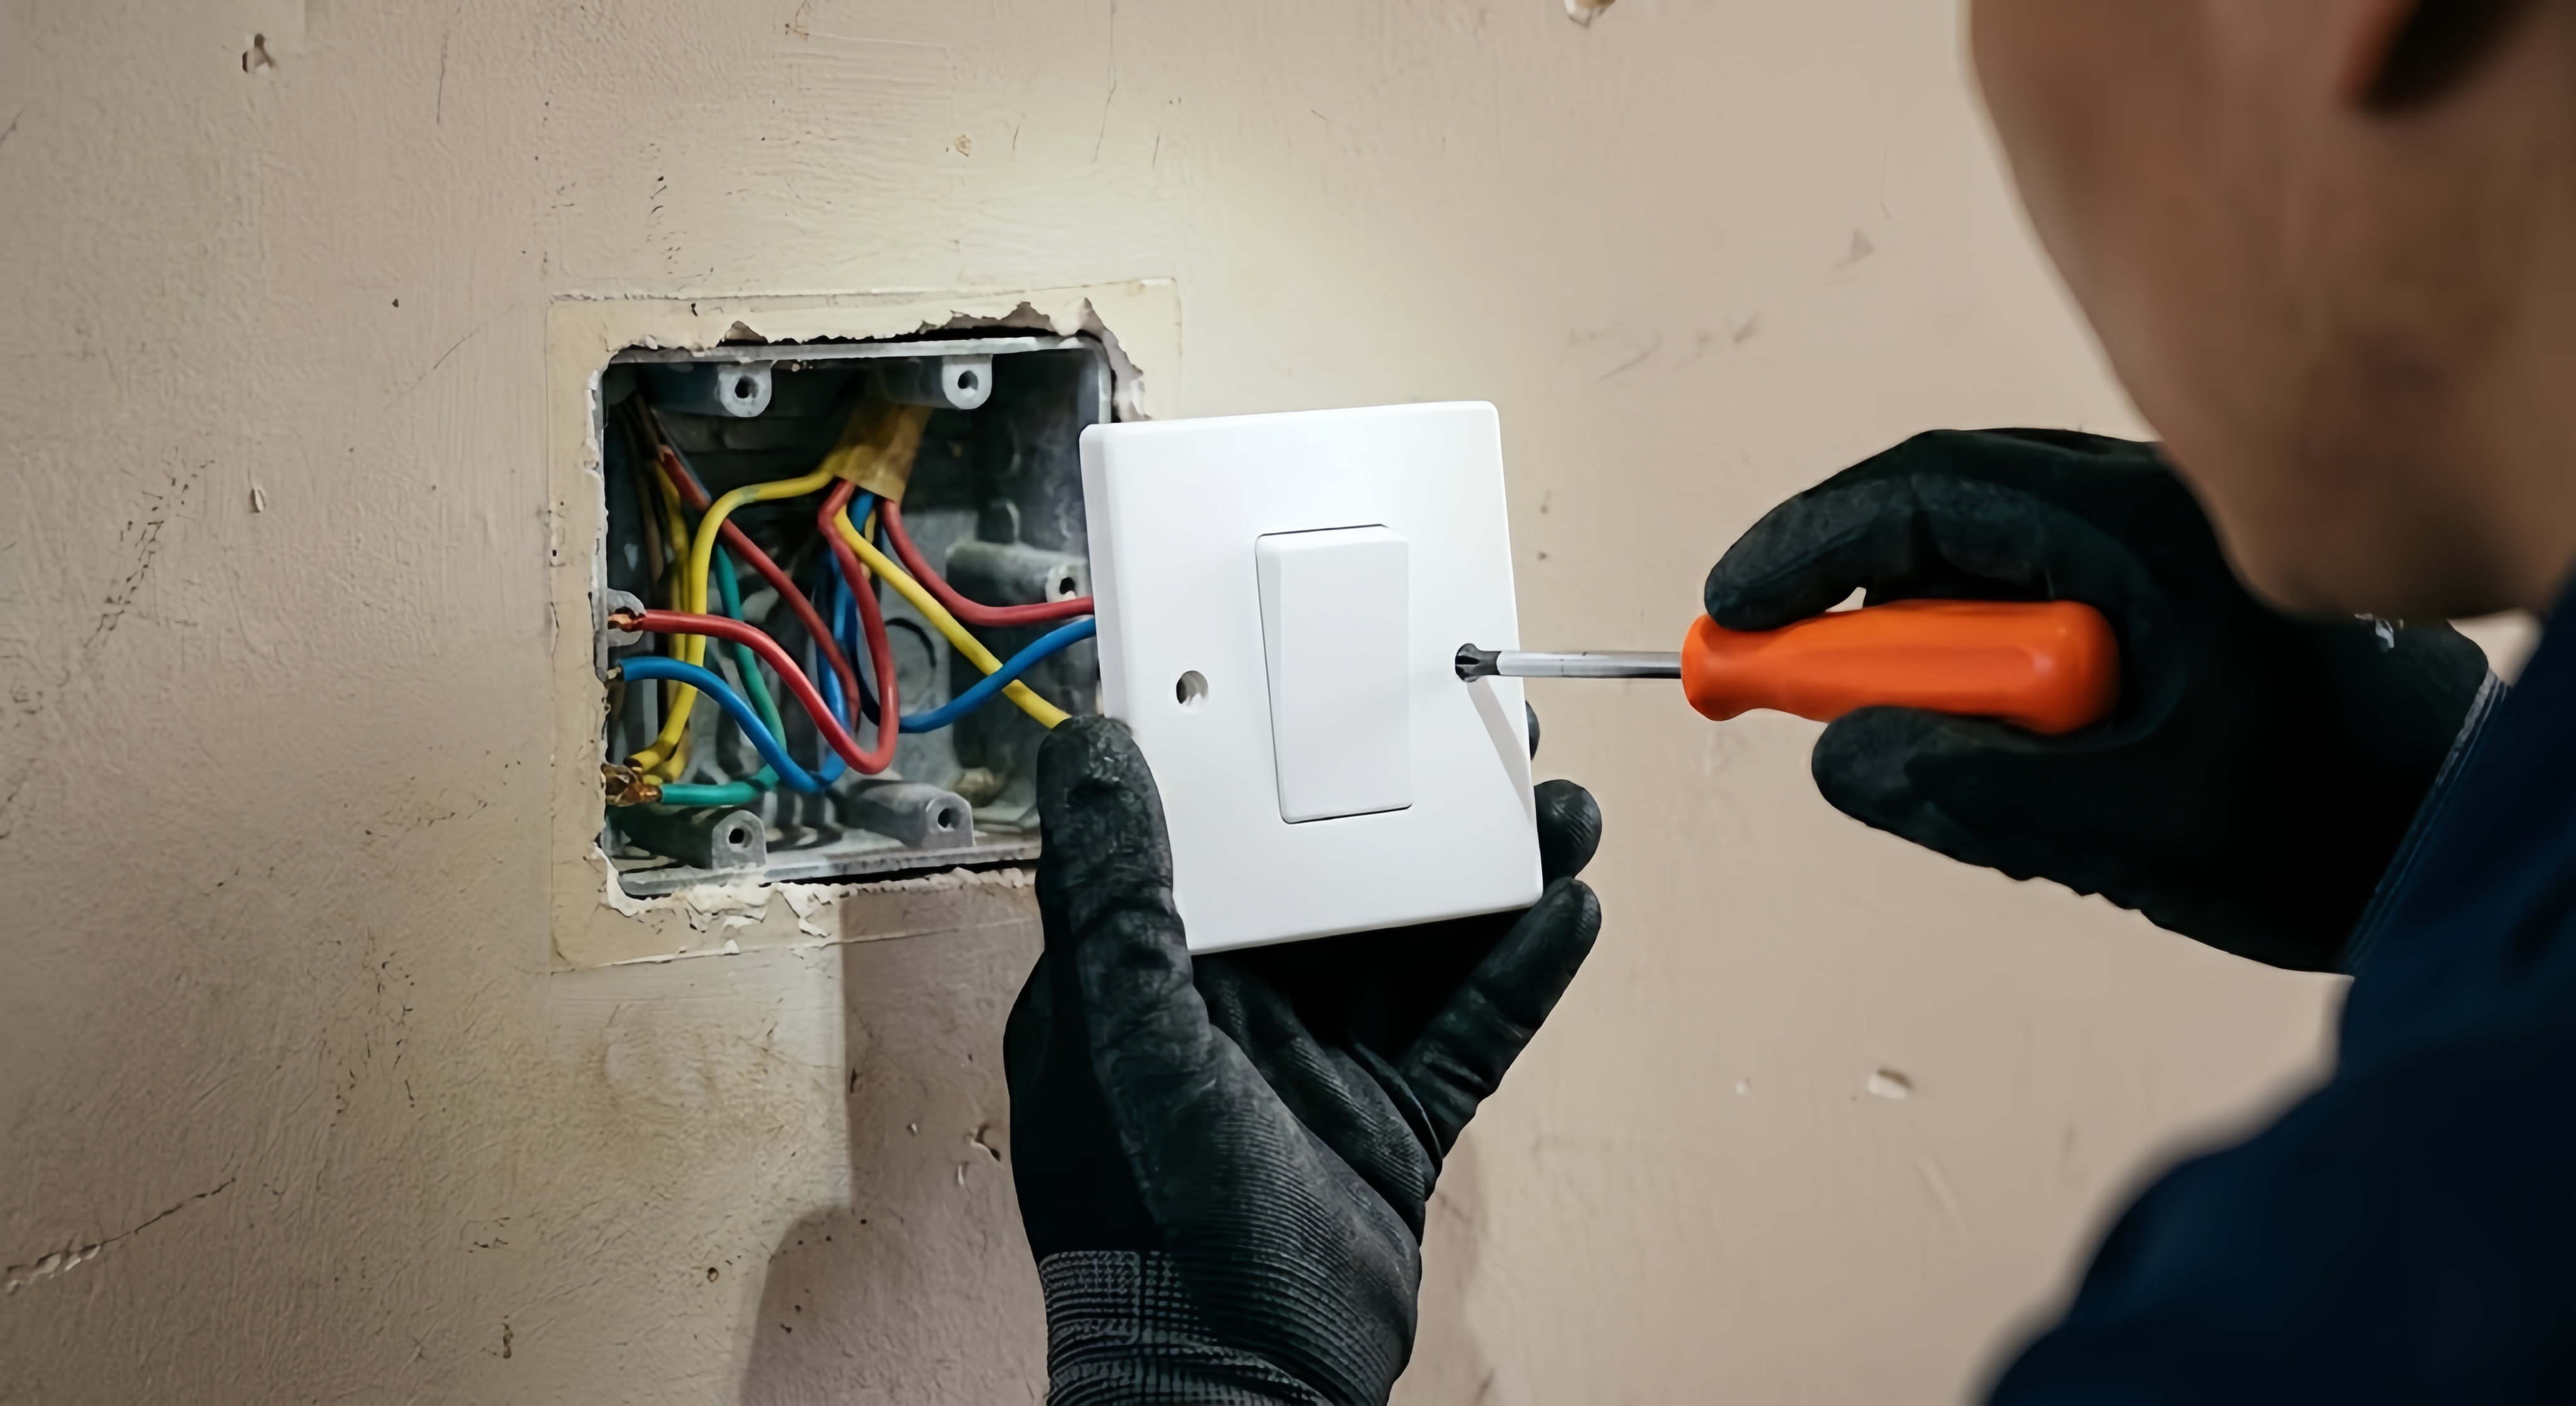
Remove Cover Plate and Old Switch
Go to your breaker box and turn off the power for the room where you want to replace light switch. Never skip this step.
Use your voltage tester to check that the power is really off. Hold the tester near the light switch. If it does not beep or light up, you are safe to continue.
Take your screwdriver and remove the screws from the cover plate. Set the plate aside.
Unscrew the two mounting screws at the top and bottom of the switch. Gently pull the switch out from the wall. You will see the wires still attached.
Tip: Keep all screws in a small bowl so you do not lose them.
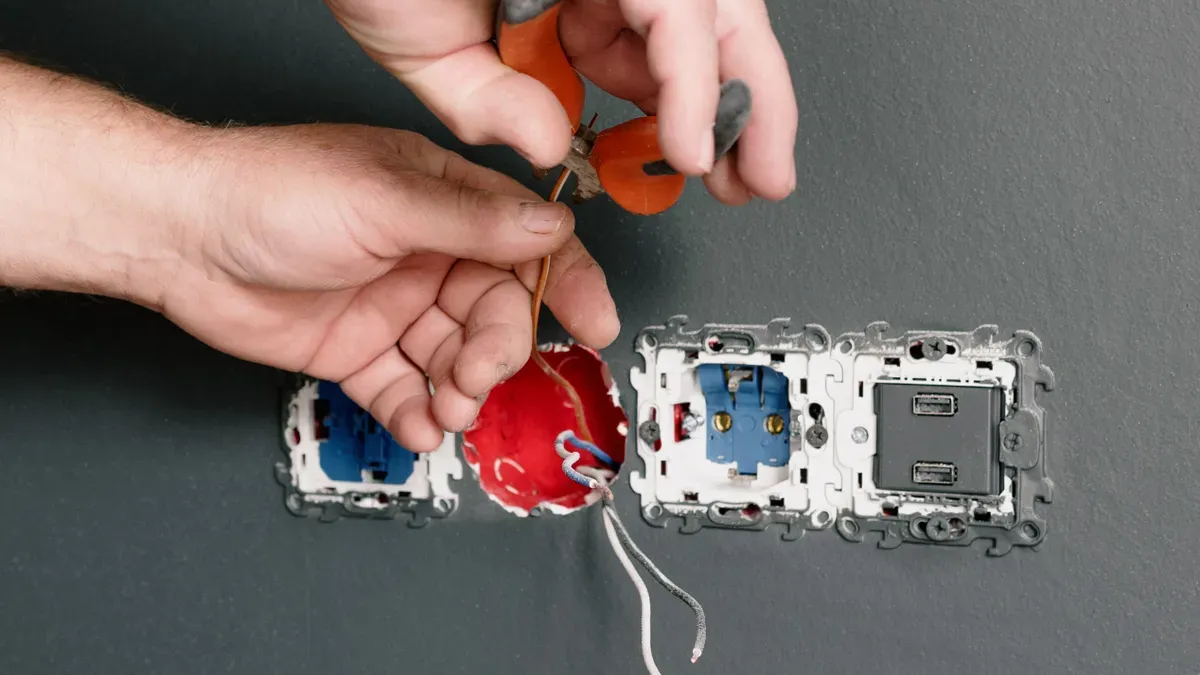
Note and Label Wire Connections
Before you disconnect anything, take a close look at the wires. You might see black, white, or even red wires. Each one has a job. Use small pieces of masking tape to label each wire. Write down where each wire connects on the old switch. This step makes installing the new light switch much easier.
Labeling wires helps you avoid mistakes.
Take a quick photo with your phone for backup.
If you feel unsure about the wires, stop and call a professional.
Install New Light Switch
Now you are ready to replace light switch with your new one.
Disconnect the wires from the old switch. Loosen the screws and gently pull the wires free.
Attach the wires to the new switch. Wrap each wire clockwise around the correct terminal screw. Tighten the screws so the wires stay in place.
Make sure the new switch matches the amperage rating of your circuit. This keeps everything safe.
If your home has aluminum wiring, use a CO/ALR rated switch.
Avoid using backstab connections. Always use the terminal screws for a strong connection.
Note: If you get confused by the wiring, do not guess. Call a licensed electrician for help.
Secure, Test, and Finish
You are almost done with changing a light switch! Now it is time to make sure everything works.
Tuck the wires back into the electrical box. Be gentle so you do not bend or break anything.
Secure the new switch to the box with the mounting screws.
Place the cover plate back on and screw it in.
Go to your breaker box and turn the power back on.
Flip the switch on and off a few times. The light should turn on and off without buzzing, sparking, or feeling warm.
If the light does not work, double-check your wiring and make sure the power is on.
If you see sparks, hear buzzing, or feel heat, turn off the power and call a professional right away.
This step-by-step guide helps you avoid common mistakes when replacing light switch. If you ever feel unsure, it is always smart to ask for help.
Changing a light switch can feel easy when you follow each step. You now know how to handle removing the old switch, labeling wires, and installing the new light switch. With this step-by-step guide, you can replace light switch without stress or sparks.
Troubleshooting Light Switch Replacement
If the Switch Doesn’t Work
You just finished installing your new light switch, but nothing happens when you flip it. Don’t worry. You can try a few simple fixes:
Make sure you turned the power back on at the breaker.
Remove the cover plate and check that each wire is tightly attached to the correct screw.
Try a new bulb or test the light fixture with a working lamp. Sometimes the problem is not the switch.
Look for aluminum wiring. If you see it, you need a CO/ALR rated switch.
If the switch feels warm, check the amperage rating and tighten all terminal screws.
Tip: Always double-check your work before moving on.
Signs of Incorrect Wiring
Sometimes, a light switch works but shows signs of trouble. Watch for these warning signs:
Warning Sign |
What It Means |
|---|---|
Flickering lights |
Loose or incorrect wiring |
Switch feels hot |
Overloaded circuit or loose wires |
Buzzing sounds |
Poor connections or wrong switch |
Sparks or burning smell |
Dangerous wiring issue |
If you notice any of these, turn off the power right away.
When to Call a Professional
You might feel tempted to fix every problem yourself. Sometimes, calling a licensed electrician is the safest choice. Many homeowners try to repair electrical issues on their own, but this can lead to serious risks. Improper wiring or damaged connections can cause fires or shocks. In fact, faulty wiring causes about half of all home electrical fires in the United States. If you feel unsure at any step, or if you see signs of trouble, call a professional. Your safety always comes first.
You can change a light switch safely if you are careful. Always use your voltage tester to make sure the power is off. For any diy project, remember these steps:
Put labels on wires before you take out the light switch.
Wrap wires around screws in a clockwise way.
Use terminal screws instead of backstab connections.
Pick a CO/ALR switch if you have aluminum wiring.
If you ever feel confused while changing a light switch, look for guides like Electrical Advice Worth Reading or Electrical Safety: What Every First-Time Homeowner Should Know.
If you are not sure, call a professional. Staying safe is most important!
FAQ
Can I replace a light switch without turning off the breaker?
No, you should always turn off the breaker. This step keeps you safe from electric shock. Never skip it.
What if I see three wires on my old switch?
You might have a three-way switch. Take a photo and label each wire. If you feel unsure, call an electrician.
Do I need a special switch for aluminum wiring?
Yes, you need a CO/ALR rated switch. Regular switches do not work safely with aluminum wires.
Aktie:
Beleuchtung für das Wohnzimmer leicht gemacht mit einfachen Tricks
Discover the Top Staircase Lighting Options for 2026